-
Table of Contents
“Master the Art of Window Tinting: Essential Best Practices for a Flawless Finish.”
Window tint application is a process that enhances the aesthetic appeal and functionality of vehicles and buildings by applying a thin film to glass surfaces. Proper application is crucial to ensure optimal performance, longevity, and compliance with legal regulations. This guide outlines the best practices for window tint application, covering essential preparation steps, tools and materials needed, techniques for a flawless finish, and tips for maintenance. By following these best practices, individuals can achieve a professional-looking tint that provides benefits such as UV protection, heat reduction, and increased privacy.
Choosing The Right Window Tint Film
When it comes to enhancing the functionality and aesthetics of your vehicle or home, choosing the right window tint film is a crucial step that can significantly impact the overall outcome. The selection process begins with understanding the various types of window tint films available on the market. These films can be broadly categorized into several types, including dyed, metalized, ceramic, and hybrid films. Each type possesses unique characteristics that cater to different needs and preferences. For instance, dyed films are often favored for their affordability and ability to reduce glare, while ceramic films are renowned for their superior heat rejection and UV protection without compromising visibility.
In addition to the type of film, it is essential to consider the level of tint darkness, which is typically measured by the Visible Light Transmission (VLT) percentage. A lower VLT percentage indicates a darker tint, which can provide increased privacy and heat reduction. However, it is important to be aware of local regulations regarding tint darkness, as many jurisdictions impose legal limits on how dark window tints can be. Therefore, before making a decision, it is advisable to research and understand the laws in your area to ensure compliance and avoid potential fines.
Moreover, the purpose of the window tint should guide your choice. For instance, if your primary goal is to enhance privacy, a darker film may be more suitable. Conversely, if you are looking to reduce heat and protect your interior from UV damage, a high-performance ceramic film may be the best option. Additionally, some films offer added benefits such as shatter resistance, which can enhance safety by holding shattered glass together in the event of an accident. This feature is particularly appealing for those who prioritize security and safety in their vehicle or home.
Furthermore, the quality of the window tint film is paramount. Investing in high-quality films from reputable manufacturers can make a significant difference in durability and performance. Cheaper films may fade, bubble, or peel over time, leading to additional costs for replacement and installation. Therefore, it is wise to seek out films that come with warranties, as this can provide peace of mind regarding the longevity and effectiveness of the product.
In addition to the film itself, the installation process plays a vital role in the overall effectiveness of window tinting. Even the highest quality film can underperform if not applied correctly. Therefore, it is advisable to seek professional installation services, as experienced technicians possess the skills and tools necessary to ensure a flawless application. Professional installers can also provide valuable insights into the best film options based on your specific needs and preferences.
Ultimately, choosing the right window tint film involves a careful consideration of various factors, including the type of film, level of darkness, intended purpose, quality, and installation method. By taking the time to evaluate these elements, you can make an informed decision that not only enhances the appearance of your vehicle or home but also improves comfort and safety. As you embark on this journey, remember that the right window tint film can transform your space, providing benefits that extend far beyond aesthetics. Thus, investing in quality and professional installation is a decision that will yield long-term rewards.
Preparing The Surface For Application

Preparing the surface for window tint application is a critical step that significantly influences the overall quality and longevity of the tint. Proper preparation ensures that the adhesive bonds effectively to the glass, minimizing the risk of bubbles, peeling, or other imperfections that can detract from the aesthetic and functional benefits of the tint. To achieve optimal results, it is essential to follow a systematic approach that addresses all aspects of surface preparation.
Initially, the window surface must be thoroughly cleaned to remove any dirt, dust, grease, or residues that may interfere with the adhesion of the tint. Using a high-quality glass cleaner is advisable, as it effectively eliminates contaminants without leaving streaks or films. It is important to apply the cleaner using a lint-free cloth or paper towel, as traditional cloths may leave fibers behind that can compromise the tinting process. After cleaning, it is prudent to inspect the glass for any scratches, chips, or imperfections. Such flaws can not only affect the appearance of the tint but may also lead to premature failure of the adhesive bond.
Once the glass is clean and inspected, the next step involves ensuring that the surface is completely dry. Moisture can hinder the adhesion of the tint, leading to bubbling or peeling over time. Therefore, it is essential to allow the glass to air dry completely or to use a clean, dry cloth to wipe away any remaining moisture. This step is particularly crucial in humid environments, where condensation can form on the glass surface, complicating the application process.
In addition to cleaning and drying, it is beneficial to consider the temperature of the environment in which the tint will be applied. Ideally, the application should take place in a controlled environment where the temperature is between 40°F and 100°F (4°C and 38°C). Extreme temperatures can affect the adhesive properties of the tint film, leading to suboptimal results. If the application is performed outdoors, it is advisable to choose a day with mild weather conditions to ensure that the tint adheres properly.
Furthermore, it is essential to prepare the tint film itself before application. This involves measuring and cutting the film to the appropriate size, allowing for a slight overlap on the edges to ensure complete coverage. It is also advisable to handle the film carefully, avoiding contact with the adhesive side as much as possible. Any oils or contaminants from fingers can compromise the bond between the film and the glass.
As the final step in surface preparation, it is recommended to use a solution of water and a few drops of dish soap to create a slip solution. This mixture can be sprayed onto the glass just before applying the tint. The slip solution allows for easier positioning of the film and helps to eliminate air bubbles during the application process. By following these best practices for surface preparation, one can ensure a successful window tint application that not only enhances the appearance of the vehicle or building but also provides the desired benefits of UV protection, heat reduction, and increased privacy.
In conclusion, meticulous attention to detail during the surface preparation phase is paramount for achieving a flawless window tint application. By ensuring that the glass is clean, dry, and at the appropriate temperature, as well as preparing the tint film properly, one can significantly enhance the effectiveness and durability of the window tint.
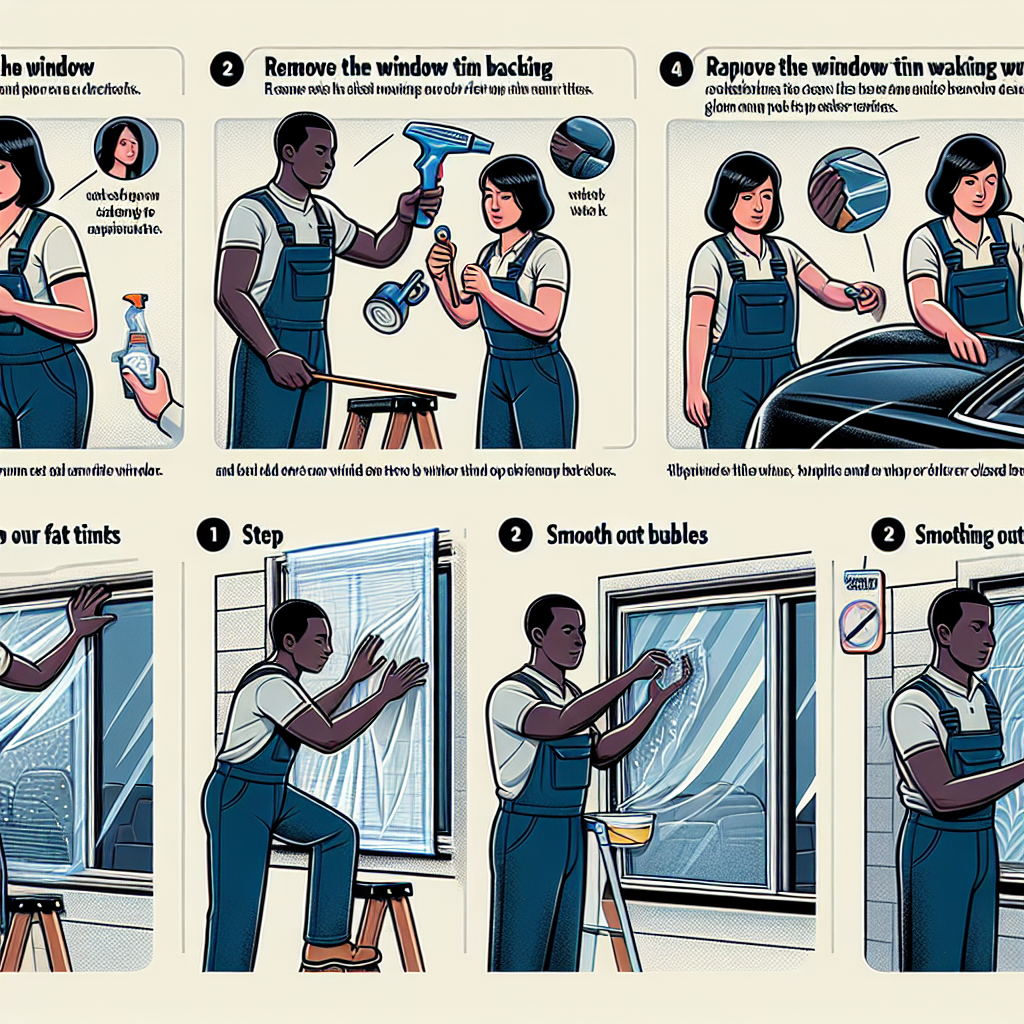
Techniques For A Flawless Tint Installation
When it comes to achieving a flawless window tint installation, understanding the techniques involved is essential. The process begins with meticulous preparation, which sets the foundation for a successful application. First and foremost, the windows must be thoroughly cleaned to remove any dirt, dust, or grease that could interfere with the adhesion of the tint film. Using a high-quality glass cleaner and a lint-free cloth ensures that the surface is pristine. Additionally, it is advisable to clean the window edges and seals, as contaminants in these areas can lead to peeling or bubbling over time.
Once the windows are clean, the next step involves measuring and cutting the tint film. Precision is crucial during this phase, as even minor discrepancies can result in an uneven appearance. It is recommended to use a sharp utility knife and a straight edge to achieve clean cuts. Moreover, allowing for a slight overlap at the edges can help ensure complete coverage and prevent gaps. After cutting, the film should be carefully positioned on the window to verify that it fits correctly before proceeding with the installation.
Following the preparation and cutting, the application of the tint film can begin. This stage requires a careful balance of technique and patience. It is advisable to work in a controlled environment, ideally indoors, to avoid dust and debris that could compromise the installation. Additionally, using a spray solution made of water and a few drops of dish soap can facilitate the application process. This solution allows for repositioning the film during installation, ensuring that it adheres smoothly without bubbles or creases.
As the film is applied, it is important to use a squeegee to remove any trapped air and excess solution. Starting from the center and working outward helps to push air bubbles towards the edges, where they can be more easily eliminated. This technique not only enhances the appearance of the tint but also ensures a strong bond between the film and the glass. It is crucial to apply consistent pressure while squeegeeing to avoid damaging the film or the window.
After the initial application, the edges of the tint should be trimmed to achieve a clean finish. This step requires careful attention to detail, as jagged edges can detract from the overall aesthetic. Using a sharp blade, the installer should carefully cut along the window’s edge, ensuring that the film is flush with the glass. Once trimmed, it is advisable to re-squeegee the edges to ensure that they are securely adhered.
Finally, allowing the tint to cure is an essential part of the installation process. While many installers recommend waiting at least a few days before rolling down the windows, it is important to follow the manufacturer’s guidelines for specific curing times. This patience ensures that the film adheres properly and maintains its integrity over time. In conclusion, achieving a flawless window tint installation involves a series of well-executed techniques, from thorough cleaning and precise cutting to careful application and finishing touches. By adhering to these best practices, one can ensure a professional-looking result that enhances both the appearance and functionality of the vehicle or building windows.
Q&A
1. **What is the ideal temperature for applying window tint?**
The ideal temperature for applying window tint is between 40°F and 90°F (4°C to 32°C) to ensure proper adhesion and prevent bubbling.
2. **How should the glass be prepared before applying window tint?**
The glass should be thoroughly cleaned with a glass cleaner and a lint-free cloth to remove any dirt, dust, or oils that could affect the tint’s adhesion.
3. **What is the recommended method for smoothing out air bubbles during application?**
Use a squeegee or a similar tool to gently push air bubbles towards the edges of the film, ensuring a smooth application without damaging the tint.In conclusion, applying window tint effectively requires careful preparation, precise measurement, and adherence to best practices, including selecting high-quality materials, ensuring a clean surface, and using the right tools and techniques. Proper installation not only enhances aesthetics and privacy but also improves energy efficiency and protects interior surfaces from UV damage. Following these best practices can lead to a successful and long-lasting window tint application.